|
| Main Help Index |
Save time using the Profile Manager
- About profiles
- Creating profiles
- Set defaults for all site-specific data
- Applying profiles to Batch Listings
- Attach profiles to Inventory Items
- Overriding categories in your profile
- Using the default profile
| About profiles | |
| Profiles are stored standard information. Rather than typing your location, shipment and payment options and other site-specific information repeatedly for each new item you create, you can enter that information in once and store it in a profile. You can then use this profile to fill in that stored information for as many items as you like. | |
| Creating profiles | Back to the top |
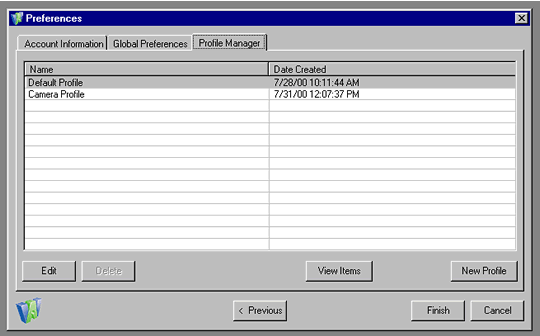
| To create a profile, choose Edit > Profile Manager to open the Profile Manager. The Profile Manager is where you create and manage profiles. Click the New Profile button to open the Profile Editor.
You will notice that the Profile Editor contains three tabs, one each for eBay, Amazon, and Yahoo! Each of the site-specific tabs is identical to the site-specific information tabs used in Batch Listings. Complete as much information as you wish. There are no required fields in a profile. Enter a name for the profile in the upper right. Click Finish to close the Profile Editor. You can make as many profiles as you like. Using profiles saves you from having to enter in the same information all over and over again. Hint: If you forgot to type in a new name, the Profile Editor will name the first one Profile 1, the second one Profile 2, etc., similar to the way Microsoft Windows names new documents. To rename the profile, highlight it in the Profile Manager, click Edit, change the name in the upper right corner and click Finish. |
|
| Setting defaults for all site-specific data | Back to the top |
| Open the profile manager by selecting the
You will notice that the Profile Editor contains three tabs, one for eBay, Amazon, and Yahoo! Each of the site-specific tabs is identical to the site information tabs used in Batch Listings. Complete as much information as you prefer. Before selecting the finish button, type the profile name into the dialogue box in the upper right-hand corner of the Profile. |
|
| Applying profiles to Batch Listings | Back to the top |
| To use a profile to fill in information in a batch listing, you apply the profile to the listing.
Note: You can not use more than one profile with any single item. For example, suppose you auction CDs all the time. Since you choose the same options for CDs, you have a profile that contains this information. When you want to auction a CD, you create the item and fill in the basic information. In the upper right of both the Basic Information tab and the Site Information tab, there is a Profile field. Select your CD profile and click Apply to apply your CD profile to the item. The profile fills in all the information you specified.
Important: You can apply a profile to an item and then edit the item, changing values filled in by the profile. This only changes the values for that item. Your changes are not reflected in the profile. |
|
| Attaching profiles to Inventory Items | Back to the top |
| You can use profiles with inventory items as well. In the Inventory Listing, you will see a field labeled Profile. If this field is filled in, you are using a profile with this item.
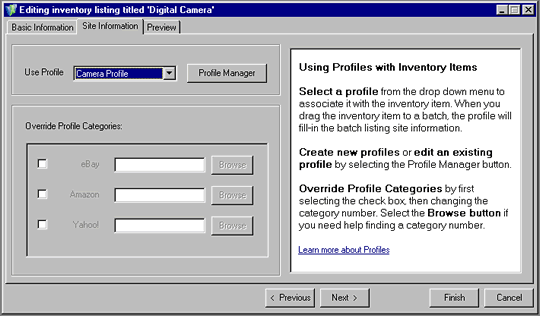
Note: You can not use more than one profile with any single item. To use a profile with an inventory item, go to the Site-Specific Information tab, choose your profile from the drop-down in the upper right and click Use Profile. You will not see the profile information in the inventory item, as the inventory does not contain those fields. All you are doing is associating the profile with the inventory item. If you then drag that item to a batch, you will see the profile information filled in for that batch item.
Note: Using the profile with the inventory item does not fill in any information until the inventory item is made part of a batch. If you use the profile with the inventory item and then change the information in the profile, when you drag the inventory item to the batch, you will see the new information filled in. |
|
| Overriding categories in your profile | Back to the top |
|
If you have a category set in the profile, but need to override that category for this particular item, you can check the box for the site and enter the category you wish to use.
Hint: If you use one profile for a wide set of items, such as CDs, the category override option is especially useful. You can override the sub-category to reflect the type of music on the CD. For example, you have the profile set to the eBay category: Books, Movies, Music > Music > CDs. You can then override the category in the inventory item to reflect the type of music, say, Rock: Classic. |
|
| Using the default profile | Back to the top |
| If you do not specify any profile for an item, Sales Manager Pro will use the default profile. The default profile that is supplied with Sales Manager Pro has no values in it. You can modify this to include your information. | |


