|
| Main Help Index |
Importing & Converting Files
Back to Sales Manager Pro Help Menu
| Convert Mister Lister & Auction Assistant Classic Files | Back to the top |
Use the new Sales Manager Pro File Converter to quickly open files that you have created using Mister Lister and Blackthorne’s Auction Assistant Classic applications. Once this data had been converted to an Sales Manager Pro Batch, you can launch these auctions to Yahoo!, Amazon, and eBay. Convert a Mister Lister Collection Convert a Mister Lister CollectionFrom the main menu, choose File | Open Batch. In the Look in list, click the drive, folder, or FTP location that contains the Mister Lister Collection file you want to open, and then locate the folder that contains the file. Make sure you select MisterLister Collection (*.mrl) Files in the Files of type list.  Convert an Auction Assistant Classic file
From the main menu, choose File | Open Batch. In the Look in list, click the drive, folder, or FTP location that contains the Auction Assistant Classic file you want to open, and then locate the folder that contains the file. Make sure you select Auction Assistant Classic Batch (AA2.mdb) Files in the Files of type list. |
|
| Import Inventory from Excel & Access Files | Back to the top |
| Use the new Sales Manager Pro Inventory Importer to quickly build an auction Inventory List. Start by creating an Excel, Access, or Text file with columns containing all the Sales Manager Pro Inventory Fields that you wish to populate. These fields could include Title, Description, Image Location (type in the URL of the Image into the spreadsheet), Item Cost data, Starting Bid information, and SKU or ISBN numbers. Save your file when you have finished.
Open Sales Manager Pro and without opening your Inventory List, select Tools | Inventory Importer from the main menu. |
|
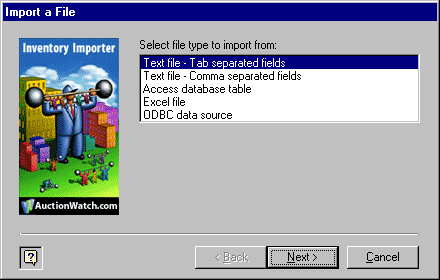
| STEP 1: Choose file type | |
| Choose the file type that you wish to import. If you created an Excel spreadsheet, choose Excel File. In addition to Excel Files, you can import Access Files, Text Files, and OBDC data source files.
|
|
| STEP 2: Select file | |
| Select the specific file that you wish to import. If necessary, select the browse button to locate the file in your windows directory. If you are opening an Excel Spreadsheet that contains more that 1 worksheet, you must also specify which worksheet you would like to import. | |
| STEP 3: Match fields | |
| You must match the fields in your data source file with the Sales Manager Pro Inventory Fields. Match each column header in your data source on the left with the appropriate Sales Manager Pro Inventory Field in the on the right using the drop down menus. The only field you must match is Title.
The Importer is set to match row 1 in your data source. To change the row you wish to associate, use the SHOW RECORD arrows to move down the data source. Likewise, Sales Manager Pro will start importing data from row 1 unless you specify a different row using the START IMPORT FROM RECORD arrows to move down the data source. When you have finished the Field Matching screen, select the Finish button to import this data into your Sales Manager Pro Inventory List. |
|
| STEP 4: Finish importing or import again | |
| You have finished importing your first file and can continue importing more files by selecting the Import button. Or, select the cancel button to close the Inventory Importer Wizard | |

