How to Use
Creating and Uploading a Batch
Back to Sales Manager Pro Help Menu
Create a Batch
Each time Sales Manager Pro starts, it opens a new, empty batch named "New Batch #1" by default. You can use this to start a new batch.
To create a new batch at any time, do one of the following:
Sales Manager Pro will always create a default batch name starting with "New Batch #". You can always rename the batch when you save it.
Create a Listing
Once you have created a new batch, you can follow the directions below to create listings. If you have multiple Batch windows open, be sure the Batch window where you want to create a new listing is highlighted (title bar is blue). If not, simply click on the Batch window you want to highlight it.
1. To create a listing in the batch, do one of the following:
2. Select a site
In the dialog box that appears, select a site (marketplace) for the listing. You may be asked to select a category or listing type depending on the site you choose. A grayed out dropdown menu means that it is not required.
Note: You must have a valid account for the site you select. See Preferences for directions on how to enter site account information.
3. Enter Basic listing information
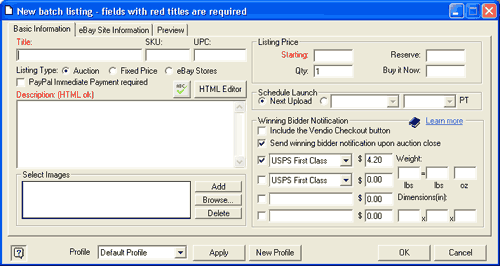
After you choose a site, the New Batch Listing window will appear. This window consists of three tabs: (1) Basic Information, (2) Site Information, and (3) Preview. The Basic Information tab is where you enter a Title for the listing, a description, images, pricing, shipping, and other basic listing information. Required fields are always in red.
Depending on the site you chose, you may see site-specific options such as Listing Type and PayPal Immediate Payment options for eBay.
Note: The pricing information required for eBay depends upon the Listing Type you choose.

To add images to your listing, do any of the following:
To add an image from the Image Bar (standard and ZoomStream images):
To add an image from a file folder on your computer (standard images only):
Note: Adding images directly from a file folder will automatically add them to your Image Bar.
See Managing Images to learn more about adding, organizing and deleting images.
The Basic Information tab also allows you to schedule listing launch times. The listing launch time is when the listing goes live on its destination site. The default launch time is "Next Upload", or the next time you Synchronize.
To schedule a launch up to 20 days in advance:
To launch the listing more than 20 days in advance:
Note: You must upload your batch before the scheduled launch time or else the listing will not be launched on time. Uploading is separate from scheduling and must be initiated manually. If a scheduled launch occurs in the past, it will launch immediately once the batch is uploaded.
4. Enter Site Information
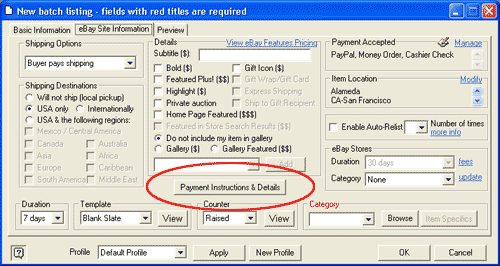
The Site Information tab contains site-specific information such as payment options and shipping terms. eBay has additional required fields in this tab, some of which depend on the Listing Type. Required fields are labeled in red. Additional eBay payment and shipping information is available by clicking on the Payment Instructions & Details button.

5. Preview the Listing
Click the Preview tab to see what your listing will look like on the site. Any changes you make appear immediately in the Preview tab. You can continue editing and previewing your listing until you are satisfied with the listing.
6. Close the Listing
When you're done, click OK from the New Batch Listing Window to close the listing.
Add More Listings
Enter as many listings as you like to complete the batch. To create more new listings, repeat the steps described above.
See Editing Items to learn how to cut, copy, paste and delete individual or multiple listings.
Save a Batch
Be sure to save your batch after you are done creating listings, or periodically if you are creating many listings. Listings in a batch are not saved to disk until you save the batch. We recommend you enable the AutoSave Batch feature to protect yourself from losing any work. See Preference to learn how to turn on AutoSave.
To save a batch, do any of the following:
Note: Consider including the upload date in the file name. For example, you might use CDs41500 for a batch of CDs uploaded on April 15th.
Upload a Batch
Batches are stored on your computer until you upload them.
1. To upload a batch, do any of the following:
Note: Upon upload, Sales Manager Pro will also perform other Synchronization operations. See Synchronizing and Uploading to learn more.
2. Check For Successful Upload
After uploading is complete, you can check the status of each listing online in your Sales Manager Control Panel or by reviewing each batch within Sales Manager Pro.
To check your listings online with Sales Manager:
To check your listings with Sales Manager Pro:
To check that images were successfully uploaded with the batch:
