How to Use
Attaching Images to Listings
Back to Image Hosting Help Menu
Attaching Images to Listings Using Sales Manager
To attach your image(s) to a Sales Manager listing, go to the Create Listing page.
- Login, and click the Sales Manager tab.
- In the left navigation bar, click on the marketplace you want to list your item (eBay, eBay Motors, Yahoo, or Amazon).
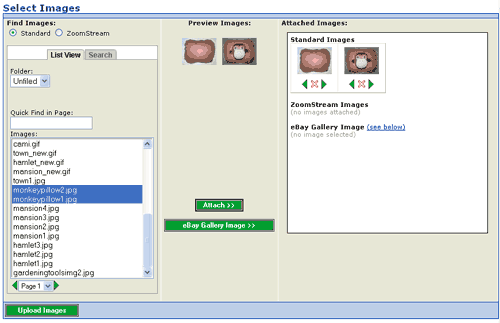
- Choose your item’s category and click the ‘Continue’ button. On the Create Listing page, scroll down to the Select Images section.
- If you want to attach ZoomStream images, select the ZoomStream Images radio button.
- Use the ‘Folder’ dropdown menu to select the folder where your image(s) are located (For Standard images only). You can use Quick Find to search within a page for an image. Alternatively, you can click the Search tab and search all of your folders for an image.
- Once you have found the image that you want to attach to your listing, click on the image name to display a preview of the image in the Preview Images pane. To attach the image displayed in the Preview Images pane, click the ‘Attach’ button. Your attached image will now appear in the Attached Images pane. You can detach the image by clicking the red ‘X’ icon, which appears below the image.
- Follow this process until you have attached all of the images you want in your listing.

Once you have attached your images to a listing, you can quickly order them by clicking the green ‘Arrow’ icons, which appear below each image. Use these icons to move your images left or right, depending on what order you want them to appear in your listings.
Attaching an eBay Gallery Image
You can use any Standard image as your eBay Gallery image. To select an eBay Gallery image:
- Ensure the Standard radio button under 'Find Images' is selected. The eBay Gallery Image button is only available in this view.
- Using the Image List, find and click the image you wish to use. A thumbnail of the image will appear in the Preview Images pane.
- Attach the image by clicking the 'eBay Gallery Image' button. Your attached image will now appear in the Attached Images pane.
Uploading More Images from the Create Listing Page
If you want to upload more images from the Create Listing page, click the ‘Upload Images’ button at the bottom of the Select Images section. This will take you to the Upload Standard Images page. Note that when you click the ‘Done’ button after uploading images, you will be taken back to the Create Listing page where you can then attach the image(s) to your listing.
Attaching Images to Listings Using Tickets Manager
To attach your image(s) to a Tickets Manager listing, go to the Ticket Editor page.
- Login, and click the Sales Manager tab.
- In the left navigation bar, click on Sell Tickets.
- Complete the required fields on the Edit Ticket Information page, and click the ‘Continue’ button.
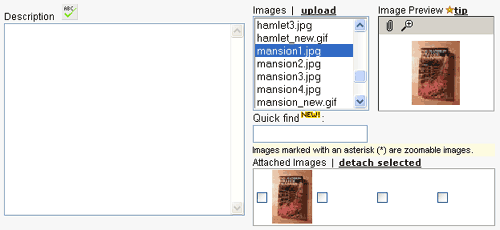
- On the Ticket Editor page, click the 'Description & Images' tab, and click on the Pencil icon to open up the selection box where you can choose your Standard or ZoomStream image(s). Click the 'Ok' button when you are finished.

- Login, and click the Sales Manager tab.
- In the left navigation bar, click on Manage Profiles.
- Click the 'New' button to create a profile, or select an existing profile and click the 'Edit' button to enter the Edit Profile page.
- Scroll down the page to the 'Description & Images' section. Highlight the image(s) that you would like to use in your listings, and click the 'Save' button at the bottom of the page. When you assign your saved profile to a listing, your image(s) will automatically be attached.
Attaching Images to Listings Using Vendio Stores
To attach your Standard image(s) to a Vendio Store listing, go to the Create Listing page.
- Login, and click the Vendio Stores tab.
- In the left navigation bar, click on Create Store Item.
- On the Create Listing page, select New Item, and click the ‘Continue’ button.
- Highlight the Standard image(s) you want in your listing and click the attach image icon. Your attached image(s) will be displayed as a thumbnail in the Attached Images section.
- Follow this process until you have attached all of the images you want in your listing.

- Click the Image Hosting tab.
- In the left navigation bar, click on ZoomStream Images.
- Find the Image you want to use in your Store listing, and click on its Image Filename.
- Copy (Ctrl+C) all of the code in the upper left-hand window of the Preview page.
- Click the Vendio Stores tab, and create a Store listing by clicking on ‘Create Store Item’.
- On the Create Listing page, select New Item, and click the ‘Continue’ button.
- Attach a Standard image, which will appear as a thumbnail in your Store listing (ZoomStream image format is not compatible with thumbnail images, so a Standard Image must be attached to your Store listing for a thumbnail to appear).
- Paste (Ctrl+V) your code directly after your item description text.
Attaching Images to Listings Using the Attach Buttons
The Attach Buttons allow customers (with an Image Hosting plan only) to attach images to a new or existing auction. Important: Sales Manager users, please use Sales Manager to create your listings and attach images.
Follow the steps below to attach your image(s) to a new or existing auction:
- Login, and click the Image Hosting tab.
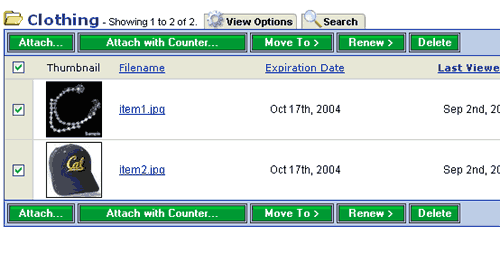
- Open a folder to access your images, and select the checkbox(s) of the image(s) that you want to attach to your listing.
- Click the ‘Attach Button’ or the ‘Attach with Counter’ button.

- To attach your image(s) without a counter, select the ‘New Auction’ radio button if you are attaching your image(s) to a new auction, or select the ‘Existing Auction’ radio button if you are attaching your image(s) to an existing auction.
- Use the ‘Select an Auction Site’ dropdown menu to select the appropriate auction site, and click the ‘Continue’ button.
- Follow the instructions on the following page to attach your image(s) (depending on your selection, the process to attach your image(s) will differ).
- To attach your image(s) with a counter, follow the steps outlined on the page and click the ‘Continue’ button.
- On the following page, select the ‘New Auction’ radio button if you are attaching your image(s) to a new auction, or select the ‘Existing Auction’ radio button if you are attaching your image(s) to an existing auction.
- Use the ‘Select an Auction Site’ dropdown menu to select the appropriate auction site, and click the ‘Continue’ button.
- Follow the instructions on the following page to attach your image(s) (depending on your selection, the process to attach your image(s) will differ).
