How to Use
Managing Standard Image Folders
Back to Image Hosting Help Menu
About Folders
Folders allow you to efficiently organize your Standard Images so you can find them quickly later on. At this time, you cannot organize ZoomStream images into folders.
Creating Folders
Creating folders from the Image Hosting home page
- Login, and click the Image Hosting tab.
- In the left navigation bar, click on 'add'.
- Enter the name of your folder and click the 'OK' button.
- Login, and click the Image Hosting tab.
- In the left navigation bar, click on 'manage'.
- Click the 'New Folder' button, which depending on your folder preferences, will automatically name your folder using date or name format. You can overwrite the Folder Name field and name your folder manually.
- Click the 'Done' button.
- Login, and click the Image Hosting tab.
- Click the 'Upload Images' button to enter the Upload Standard Images page.
- Name your folder in the 'Create New Folder' field, or leave the default name that already appears (depending on your folder preferences, the default folder name will automatically be in date or name format). You can overwrite the Folder Name field and name your folder manually.
- Click the 'Create' button.
Renaming Folders
- Login, and click the Image Hosting tab.
- In the left navigation bar, click on 'manage'.
- Rename a folder by overwriting the text in the appropriate Folder Name field.
- Click the 'Done' button.
Moving Images Between Folders
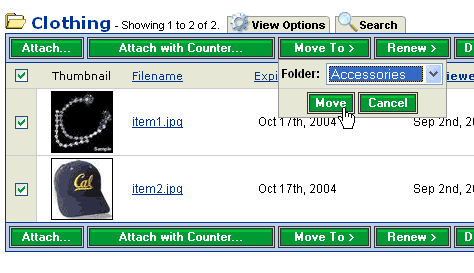
If you want to move an image(s) from one folder to another, open a folder to access your images and select the checkbox(es) of the image(s) that you want to move.
- Click the 'Move To' button.
- From the appearing dropdown menu, select the folder that you want to move your image(s), and click the 'Move' button.

Deleting Folders
- Login, and click the Image Hosting tab.
- In the left navigation bar, click on 'manage'.
- Select the checkbox(s) to the left of each folder name and click the 'Delete' button.
