How to Use
Uploading Images
Back to Image Hosting Help Menu
Uploading Standard or ZoomStream Images
Before uploading your images, make sure all adjustments to color, cropping, and file size have been made using photo-editing software. Standard images must be less than 2,048KB, while ZoomStream images must be less than 15MB.
1. Access the Online Uploader
- Login and click the Image Hosting tab.
- Click the 'Upload Images' button to access the Online Uploader.
- Or, select 'Upload Images' from the Jump to dropdown menu located in the upper right of most pages.
- If you are uploading Standard images, remain on the page. If you are uploading ZoomStream images, select the ZoomStream Images radio button. This will take you to the ZoomStream Uploader.
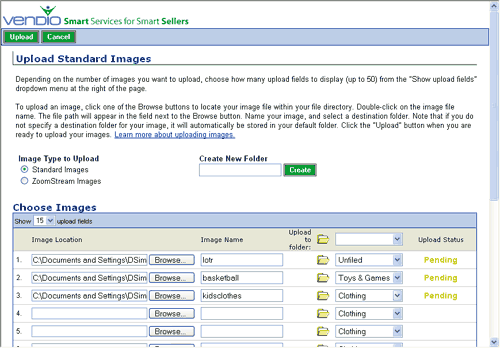
- On the Upload Standard Images page, enter a name for your folder in the "Create New Folder" field, or simply leave the default name.
- Click the 'Create' button.

3. Select your files and upload
- Increase the number of upload fields on the page if necessary by selecting the number from the 'Show upload fields' dropdown at the top left of the page. You can upload as many as 50 images at once.
- Click the first Browse button. In the dialog box that appears, navigate to the folder containing your image, select your image, then click Open.
- Rename the image if you want by editing the corresponding name in the Image Name field (you do not need to type the file extension as part of the file name).
- For Standard Images, select the folder you want to upload to.
- Repeat these steps for each additional image. It is not necessary to fill in all upload fields.
- When you have finished selecting all your images, click the 'Upload' button. You will see the status of each image as it's being uploaded.
- When uploading is complete, you will be shown a confirmation page.
- If you have uploaded any images with the same names as ones already in your account, you will be given several choices: keep the auto-created name, rename it to something else, or replace the existing image online. To keep the auto-created name, take no additional action. To rename it, type in a new name. To replace the existing image, select the Replace option.
- To leave the confirmation page and save any rename or replace selections, click the 'Upload More' button, or click the 'Done' button.

Bulk Uploading Images Using Vendio's Desktop Software
Vendio offers two offline tools to help you upload images in bulk.
Vendio customers running Windows XP can save time uploading images by using Vendio XPress Image Publisher. This tool will help you:
- Upload images directly from your digital camera.
- Upload an entire folder of images stored in any Windows directory.
- Upload Standard or high quality ZoomStream images.
Vendio's offline listing tool, Sales Manager Pro, makes it easy to upload images in bulk along with the listings you create offline. This tool will help you:
- Upload an entire folder of images stored in Sales Manager Pro.
- Upload Standard images only.
- Import images that are already hosted online.
- Create listings offline with images already attached.
