Tickets Manager
- How to Create a Profile
- Profile Settings
- How to Save Your Profile
- How to Assign Your Profile to a Listing
Store Your Common Listing Settings in Profiles to Save Time
Profiles allow you to create listings without having to manually enter information such as your:
- Title, subtitle, and description section
- Starting and reserve price
- Shipping and payment details
- Make sure you are logged in.
- Click on the Sales Manager tab, then on the Manage Profiles in the left navigation bar.
- On the Manage Profiles page, click the 'New' button to create a new profile, or select an existing profile and click the 'Edit' button to change its settings.
- Once inside the Edit Profile page, you can create a new profile by making changes to an existing one. Simply select the profile you want to base your changes on from the 'Current profile based on:' dropdown menu.
Title, Selling Format, & PricingHow to Save Your Profile
Begin by choosing the macros for your title, subtitle, and description sections. Your macros will automatically fill your titles, subtitles, and descriptions from the ticket information you enter on the Edit Ticket Information page. This prevents the need to cut, paste, and replace text to establish these sections of your listings. Keep in mind that you can edit and polish this information later on with just a few clicks.
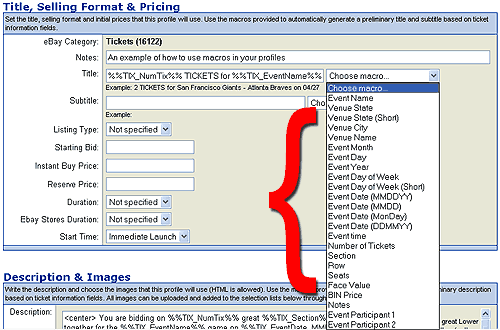
Use the 'Choose macro...' dropdown menu to select the macros for your title and subtitle. In the example illustrated below, we have chosen to display the number of tickets for sale, the event name, and the date for our title. Note than you can insert text between each macro field, such as TICKETS for or on like the example below:
(%%TIX_NumTix%% TICKETS for %%TIX_EventName%% on %%TIX_EventDate_MonDay%%).

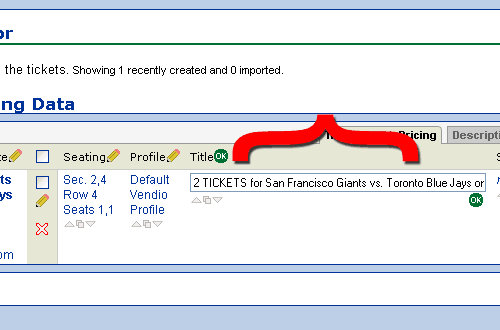
If you created a listing using the macros in the illustration above, the resulting title would appear like:
2 TICKETS for San Francisco Giants - Toronto Blue Jays on 4/27

When selecting the macros for your description, keep in mind that Vendio has already set up a default description for you using simple HTML. The default macros are set to display your event information neatly into two tables, with supporting bullets just below the tables, as illustrated below:
2 TICKETS for San Francisco Giants - Toronto Blue Jays 04/27
Date Event 04/27/04 San Francisco Giants - Toronto Blue Jays
Venue City Seating SBC Park San Francisco, CA Section Lower Box 101 Row 11
- You are bidding on 2 great Lower Box 101 seats together for San Francisco Giants - Atlanta Braves on Tuesday, April 27, 2004 at SBC Park in San Francisco, California. Time is 7:15 PM.
- Buy-It-Now for: 199.99
- Shipping costs are ***** for *****.
- PayPal is the preferred method of payment.
- Buy with Confidence - Our Feedback on eBay is *****
- Feel free to email us with any questions about this listing.
Depending on how you want your description formatted, you can delete or modify the HTML in the Description field. Pay close attention to the bullet points beneath the tables, which you can edit depending on your shipping costs, preferred methods of payment, feedback rating, etc.
Title, Selling Format, & Pricing
In addition to setting your title and subtitle macros, you can specify the listing type, starting bid, buy it now price, reserve price, duration, and start time of your listings under the Item Information section. You can leave this information blank if you prefer to enter it differently for each ticket as you create listings.Description and Images
In addition to setting your description macros, you can also choose images to include in your listings. If you want to add images to your selection list, you can upload them by going to the Image Hosting page. Learn how to upload and attach your images.Quantity, eBay Store and Design Settings
Specify the Quantity, eBay Stores Category (if any), Template Style, and Counter Type that you want to assign to your listings. Templates can be used to increase the appearance and professionalism of your listings, and you can add them to your selection list by going to the Template Preferences page. Learn more about creating or selecting pre-designed templates.Vendio Checkout Settings
Vendio Checkout helps you close your sales and process orders faster. If you want to use Vendio Checkout in your listings, select the 'Include the Vendio Checkout button and my Preferred Checkout Instructions in this listing' checkbox. If you have not yet created your preferred checkout instructions, click on the My Account link at the top of the page, then click on the Post Sale Management link to enter this information. After you are finished, click the 'Save' button and return to your profile.
Specify your shipping and handling options to make it easier for buyers to get through your Checkout process. You can also specify up to four items in your Inventory to offer buyers at Checkout to increase the likelihood of another sale.Shipping Information
Specify your shipping-related information to reflect your preferences across all listings that use this profile.Payment Information
Specify the forms of payment you accept to reflect your preferences across all listings that use this profile.Post-Sale Automation Settings
Specify up to three of your post sale options:Note that additional post sale settings are available, including invoice formatting and customization of your default post sale management messages. To view these options, click on the My Account link at the top of the page, then click on the Post Sale Management link.
- Automatically send Winning Bidder Notifications when your auctions close (Note that, because the WBN includes a link to Vendio Checkout, you must have at least one Shipping & Handling option checked and filled out in the Vendio Checkout Settings section in order to use this).
- Automatically import your winning bidders into a Customer Management folder.
- Enable Auto-Relist. Specify the number of times you want to automatically re-list your item if it closes without a winning bidder.
Promotional Options
Specify your commonly used eBay listing upgrades, such as your eBay Gallery image, preferred Listing Upgrades, and Gift Services.
After you have finished creating or editing a profile, click the 'Save' button at the bottom of the page. On the Manage Profiles page, you can enter a summary of the changes you made to your macros in the Summary field. Click the 'Done' button when you are finished.
How to Assign Your Profile to a Listing
Once you have saved your profile, you can assign it to your listings to populate all of your stored listing information automatically. You can assign a profile to a listing in two different locations:
From the Edit Ticket Information page:
After you pre-fill your event information from the Event Catalog on the Edit Ticket Information page, choose your saved profile from the Listing Profile dropdown menu located just above the 'Add to List' button. If you are importing your listings from a file, make sure that you choose your saved profile from the dropdown menu located below the 'Import listings from file' field.
From the Ticket Editor page:
On the Ticket Editor page, click the pencil icon that appears to the right of the profile heading. Alternatively, you can click the profile name itself (it's colored in blue) to open the drop box where you can select your saved profile. Click the 'OK' button when you have selected the correct profile.
