

Click Here. Double your traffic. Get Vendio Gallery - Now FREE!
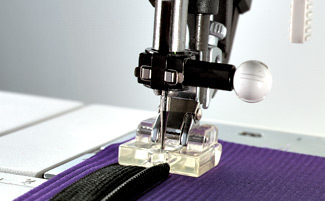
Invisible Zipper Foot
Invisible zippers are the least noticeable of all zippers. As
the name implies, the zipper is hidden in a seam, becoming virtually
invisible. This makes it a popular choice for elegant clothing sewn with
expensive materials, like evening wear. But it‘s equally appropriate
for skirts, blouses and other everyday clothing items. Invisible zippers
(also called concealed zippers) are easily sewn with the Pfaff
Invisible Zipper Foot!
- Use the marking pen to mark the length of the zipper on the right
side of the fabric, on both sides of the opening. The zipper should be
at least 2 cm to 3 cm (3/4 to 1 1/4 inch) longer than the opening.
- Attach the special Invisible Zipper Foot and select a straight
stitch, center needle position and stitch length to 2.5 to 3.0 mm.
- Open the zipper and flatten the coil slightly with your thumb, so
that the seam line between the tape and the coil becomes visible. Never
iron the zipper.
- Place the right half of the zipper onto the right side of the
opening, with right sides of the zipper and fabric together. The coil
should lie directly on the seam line, starting about 1.5 to 2 cm (5/8 to
3/4 inch) below the upper edge of the fabric. Pin in place, if desired.
Make sure that the bottom end of the zipper extends 2 cm to 3 cm (3/4
to 1 1/4 inch) beyond the bottom end of the opening. (ill. A)
- Carefully press the teeth slightly to the right and lower the zipper
foot, so that the coil lies in the groove to the right of the needle.
- Starting at the top, sew the zipper in place, stopping at the
previously marked end of the opening. Tie-off the end of the seam. Close
the zipper. (ill. B,C)
- Place the second zipper tape on the left side of the opening, on the
right side of the fabric. Make sure that both coils are level.
- Pin the zipper in place. Open the zipper.
- Carefully press the teeth slightly to the left and lower the Zipper
Foot, so that the coil lies in the groove to the left of the needle.
- Starting at the top, sew the zipper in place, stopping at the
previously marked end of the opening. Tie-off the end of the seam. Close
the zipper.
- Finally, sew the seam below the zipper, starting at the bottom and
working up. Attach the standard Zipper Foot so that the presser foot
clamp and the foot are to the right of center. Move the needle to the
right. (ill. D)
- Pull the loose bottom end of the zipper toward the seam allowances
and stitch as close as possible up to the last stitches of the zipper
seams.
- Press the seam open.
TIP: If the zipper is too long, sew over the end of
the coil with a straight stitch or a closely spaced zigzag stitch,
approx. 2 cm (3/4 inch) below the bottom end of the opening. Cut off the
excess zipper and finish the raw edge with a small piece of fabric.
820474-096
|

 Shopping Cart